Quick answer: Plaiting your horse's mane for competition involves cleaning and trimming the mane to roughly 10cm, sectioning it into even 2cm strips, braiding each section from poll to withers, then folding or rolling the end into a button secured with a band or thread. At EA-affiliated events in Australia, plaiting is optional, not mandatory, and any style is acceptable, including button braids, running braids, or leaving native breeds unplaited. The traditional approach is an odd number of plaits on the neck (9 to 13) plus the forelock, braided on the right side. You will need a mane brush, plaiting spray, plaiting bands or waxed thread with a blunt needle, and a bit of patience.
Grooming your horse for a competition is about more than just turning up looking tidy. Plaiting, when done well, shows the judge that you have put thought and care into your presentation, and it gives the neck a cleaner topline that flatters the horse's conformation. But here is the thing that trips up a lot of Australian riders: there is no rule saying you have to do it.
What matters more than the plaits themselves is getting the basics right. A clean, well-brushed mane with a decent grooming brush is the foundation. If the mane is tangled, dirty, or too long, your plaits will look messy no matter how much practice you have. So before we get into the technique, let us talk about the tools and the approach that actually work for Australian conditions. If you are looking for broader grooming advice, our grooming essentials range covers everything you need for show day prep.

A clean, well-brushed mane is the starting point for every decent set of plaits.
How to Plait a Horses Mane with Thread
Sewn-in plaits are the traditional method, and in my 15 years keeping horses, I have found they hold up better than bands for longer competition days. The technique uses a blunt needle and waxed thread to secure each braid, which gives you a tighter, neater button that will not slip or pop during a warm-up class on a 35-degree Sydney afternoon.
Here is how it works. After braiding each section tightly from the poll down to the withers, you thread your needle and run it through the base of the braid. Then you fold the braid under itself, roll it into a button shape, and pass the needle through the roll two or three times to lock it in place. You finish by knotting the thread close to the crest and snipping the tail.
The advantage of thread is staying power. Once a sewn plait is in, it does not budge. The disadvantage is speed. If you are plaiting 11 or 13 sections plus a forelock, threading a needle for each one takes time. You also need the right tools. The Ippico Aluminium Plaiting Needles (3 Pack) are what I keep in my show kit. They are lightweight, and the blunt tip will not catch on the mane or prick the crest.

Ippico Aluminium Plaiting Needles (3 Pack) — the blunt tip prevents catching on the mane crest.
One mistake I see regularly: riders using regular sewing thread. It snaps. You need waxed thread or plaiting thread specifically, because the wax coating grips the hair and stops the knot from sliding. If you cannot find waxed thread locally, dental floss works in a pinch, though it is a bit thicker and can show through lighter manes.
How to Plait Horse Mane with Bands
Banding is the faster method, and for most amateur riders in Australia, it is the one I would recommend starting with. You braid each section the same way, but instead of sewing, you secure the end with a small rubber plaiting band. Then you fold or roll the braid into a button and wrap a second band around the base to hold the shape.
The rider's take: The first time I plaited for a local Ag show, I tried threading 13 plaits in the float at 5am with a head torch. Half of them came undone before I got to the warm-up. Switched to bands the next show and never looked back. They are not as polished as sewn plaits, sure, but for anything under state level, nobody is checking whether you used thread or rubber. They are looking at whether your plaits are even and the mane sits flat.
The trick with bands is getting the tension right. Too tight and the band cuts into the crest, which is uncomfortable for the horse and can cause the hair to break over time. Too loose and the plait unravels the moment your horse shakes. What I have found in practice is that wrapping the band twice around the folded button is usually enough. Three times and you risk snapping the band.
Colour matters too. Match the band to the mane as closely as possible. Black bands on a black mane disappear completely. Black bands on a grey or palomino mane stand out like a sore thumb. I keep a mixed pack in my kit for exactly this reason.
Catalog gap note: iRide EQ does not currently stock individual plaiting bands or plaiting spray. The grooming brushes collection includes the Ippico plaiting needles and mane brushes, but bands and spray can be found at most Australian produce stores or tack shops.
How to Plait Horses Mane for Showing
Showing is where plaiting conventions actually matter, even when the rules say they do not. At EA-affiliated dressage and show jumping competitions, plaits are optional. Any style is acceptable. But the reality is that most competitors plait anyway, because a plaited mane presents a cleaner topline and shows the judge you have put in the effort.
For dressage, button braids (also called rosettes) are the standard. These are larger, rounded plaits that sit along the crest and highlight the topline. An odd number on the neck, typically 9 to 13, plus the forelock, gives you an even total when you count them all.
For show jumping, plaits are even more optional. Some riders do a full set, some do a few loose ones, and some skip entirely. If you do plait for jumping, keep them tight and secure because a loose plait that comes undone mid-round looks worse than no plaits at all.
For hunter and equitation classes, the convention is smaller, more numerous plaits, up to 30 or more, sewn with yarn. This is less common in Australia but worth knowing if you are competing internationally or in Show Horse classes.

Show day prep is about the whole picture, not just the mane.
For horses with long manes, such as Andalusians or Friesians, a running braid is a continuous French braid that runs the length of the neck. It is acceptable at smaller shows and looks striking, but it takes practice to keep the tension even from poll to withers. Lattice plaits, which create a diamond pattern across the neck, are less common and usually seen only in specialised showing classes.
If you compete in dressage bridles or saddle pads, remember that the bridle sits over the forelock plait. A French braid in the forelock, finished with a pull-through tool or yarn, keeps it tidy and prevents it from interfering with the browband. A messy forelock under a smart bridle undermines the whole turnout.
Why Braid Horse Mane
So why do we braid at all? The tradition goes back to fox hunting days in England, where braiding kept the mane from tangling in hedges and helped show off the horse's neck at a meet. The convention stuck and carried over into modern competition, where it remains a sign of respect for the judge and the occasion.
There is also a practical side. A braided mane is less likely to catch on reins, martingales, or breastplates during a round. It keeps loose hair out of the horse's eyes and ears. And for horses with thin or coarse manes, a neat set of plaits can disguise uneven growth and make the neck look more substantial than it actually is.
The welfare angle matters here too. Plaiting should never cause discomfort. If your horse flinches when you braid, the sections are too tight or you are pulling hair. Take a step back, loosen your grip, and use a detangling spray before you start, not during. A light spray of water with a dab of leave-in conditioner softens the mane enough to braid without yanking.
And for native breeds and ponies shown in their natural state, leaving the mane unplaited is correct turnout, not a failure to prepare. If you are showing a Welsh Section B or a Highland pony at an agricultural show, braiding would actually look wrong. Know your class expectations before you reach for the comb.

Tools You Actually Need
Before you start plaiting, get your kit together. Here is what I keep in my show bag:
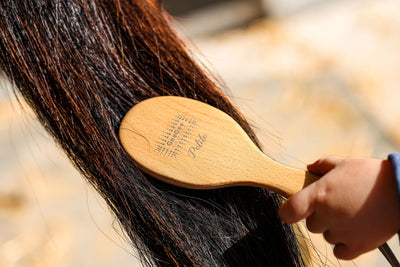
- Mane brush: A proper mane and tail brush, not a body brush. The Ippico Petite Mane and Tail Brush packs small enough for the float and gets through thick manes without pulling.
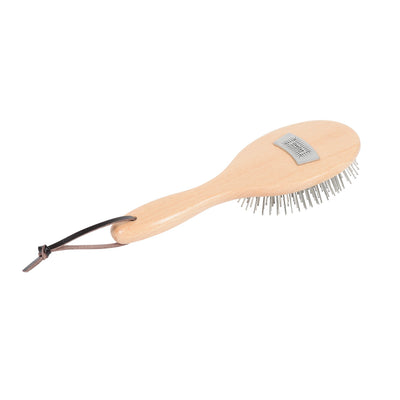
- Full-size mane brush: For home prep, the Ippico Mane and Tail Brush covers more ground on a long mane.
- Plaiting needles: The Ippico Aluminium Plaiting Needles (3 Pack) if you are sewing. Keep a spare in your kit because they bend.
- Plaiting spray: Not detangler. Plaiting spray adds tackiness for grip. Detangler makes the hair slippery, which is the opposite of what you want.
- Plaiting bands: Small rubber bands in a colour that matches your horse's mane.
- Pulling comb: For thinning and shortening the mane to roughly 10cm before you braid.
- Hair clips: Butterfly clips to hold sections out of the way while you work.
- Scissors: For snipping thread. Small, sharp, blunt-nosed.

Ippico Petite Mane and Tail Brush — compact enough for the show float, sturdy enough for thick manes.

Ippico Mane and Tail Brush — the full-size version for thorough prep at home before show day.
Step-by-Step: The Basic Button Plait
- Prep the mane: Clean, dry, and pulled or trimmed to roughly 10cm. Brush through to remove any tangles. Spray lightly with plaiting spray.
- Section: Use a pulling comb to measure even 2cm sections. Clip the rest of the mane out of the way. The key is consistency; uneven sections give you uneven plaits.
- Braid: Braid each section tightly from the poll down toward the withers. Pull across the crest, not straight down, so the braid sits on the right side of the neck. Secure the end with a band or thread.
- Form the button: Fold the braid in half twice (for a folded look) or roll it up from the bottom (for a rosette). Secure with a second band close to the base, or sew through the roll with your needle.
- Forelock: French braid the forelock, pulling inward, and finish with a pull-through or yarn. This keeps it tidy under the bridle.
- Set: Give the whole neck a light spray to hold. Step back and check for even spacing and tension.
A common mistake I see at every show: riders braiding down instead of across. If you pull the braid straight down toward the neck, it sits flat and looks pinched. If you braid across the crest, the plait lifts slightly and catches the light, which gives that polished rosette look the judges notice.
Another one: uneven spacing. Count your sections as you go. If you start with 2cm at the poll, keep 2cm all the way down. The plaits at the withers tend to be wider because the mane is thicker there, so pay extra attention to those last few sections.
If you are between mane lengths and unsure whether to pull or trim, err on the shorter side. A mane that is too long gives you floppy plaits that will not hold a button shape. A mane at 8 to 10cm is the sweet spot for most breeds. Trust me on this one.
For more on keeping your horse healthy and comfortable through competition season, browse our horse health collection.
Frequently Asked Questions
How to plait horse mane without thread?
Use small rubber plaiting bands instead of waxed thread. Braid each section the same way, secure the end with one band, then fold or roll the braid into a button and wrap a second band around the base. Bands are faster and easier for beginners, though they can snap if overtightened and are slightly less secure than sewn plaits for long competition days.
Can you leave a horses mane braided overnight?
You can, but I would not recommend it for more than one night. Leaving plaits in too long can cause pressure sores at the base of each braid, especially if the mane is damp. Remove plaits as soon as you get home and brush the mane through. If you must leave them in for a two-day show, loosen the bands slightly overnight and re-tighten in the morning.
How to braid horse mane for dressage?
For dressage, use button braids or rosettes. These are larger, rounded plaits that sit along the crest and highlight the topline. Aim for an odd number on the neck (9 to 13 is typical) plus the forelock. Braid across the crest, not down, so each button lifts slightly. Sewn plaits hold better for the longer typical dressage warm-up.
Types of horse mane braids?
The main types are button braids (rounded, for dressage), hunter braids (smaller and more numerous, sewn with yarn, for hunter classes), running braids (continuous French braid for long manes), and lattice plaits (diamond pattern, specialised). At EA competitions in Australia, any style is permissible so choose what suits your horse and discipline.
Best way to plait a horse's mane?
The best method depends on your level and discipline. For beginners, bands are faster and more forgiving. For competition polish, sewn plaits hold longer and look tighter. The key to both is even sectioning, a mane trimmed to roughly 10cm, and plaiting spray for grip rather than detangler. Practise at home before show day.
How to braid a horse's mane step by step?
1) Clean and trim the mane to 10cm. 2) Section into even 2cm strips using a comb. 3) Braid each section tightly from poll to withers, pulling across the crest. 4) Secure the end with a band or thread. 5) Fold or roll the braid into a button. 6) Secure with a second band or sew through the roll. 7) French braid the forelock. 8) Spray to hold.
Do you plait the left or right side of a horse's mane?
Traditionally, plaits go on the right side of the neck. This is convention, not a rule. At EA events in Australia, either side is acceptable, but the vast majority of competitors plait on the right for consistency. If your horse's mane naturally falls left, you can plait it on the left, but the conventional side is right.
Get Your Show Kit Sorted
Plaiting starts with the right tools. Browse grooming brushes, plaiting needles, and mane care essentials at iRide EQ, with fast Australian delivery. Your horse deserves to look the part on show day.
Shop Grooming Brushes